|
Having trouble viewing this email? View it in your browser.
|

|

Monnit Industrial
Wireless Sensors
The new industrial wireless sensors are robust and weatherproof. Using NEMA 1, 2, 4, 4x, 12 and 13 rated, sealed enclosures, these new devices are UL listed to UL508-4x specifications.
Monnit Industrial Wireless Sensors:
• IP65 NEMA 4X, CE rated.
• Sealed, weatherproof enclosure protects
from dust, light and water.
• External 2dBi or 3dBi RP SMA antenna
• 300 - 350 ft. non-line-of-sight range*
• Up to 5 year battery life.**
(Replaceable, single AA, 2500mAH, 3.6V battery)
• Operating temperature: -40° to 85°C (-40° to 185°F)
Learn More »
* Actual range may vary depending on environment.
** Battery life is determined by sensor reporting frequency
and other variables.
|
In this issue
|
|

|


|

|

Let's take a look in our crystal ball to see what the future holds at Monnit?
We have been getting requests for an even smaller form factor sensor, so Monnit's development team gladly accepted the challenge. We have been working on a new "micro" sensor line that features a RF core that is smaller than a US Dime. The sensor is powered by a small rechargeable battery and still boasts a decent wireless range. If you would like to learn more about these new sensors or be notified when they become available, please email us at sales@monnit.com.
back to top
|
|

|

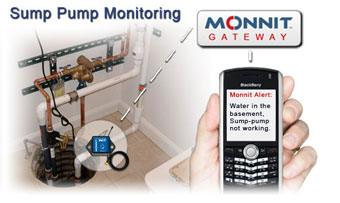
Monitoring Sump Pumps and Pits for Proper Operation.
Basement water problems can be caused by a multitude of issues ranging from high ground-water tables to thawing snow leaking through windows or the foundation. When these problems arise, it is common to have a sump pump and pit installed in a home or facility to remove water as it accumulates. However, pump motors can burn out and pump triggers can stick. How do you know if there is an issue with your
pump before it's to late?
Monnit provides a cost effective way to monitor the water level in a sump pit as well as sump pump operation. By using a Monnit wireless water sensor at the sump pit, you can place the sensor contacts in the pit to create a fail-safe level. If the water reaches this level you can be immediately notified via email, text message or phone call.
You can also monitor the pump for activity. By placing a Monnit wireless activity sensor on the pump tubing, it can sense vibration from the pump motor. This allows you track how often the pump is turning on to remove water and can work in conjunction with the water sensor to alert you if water reaches the fail-safe level and the pump has not turned on. Now you can know if there is an issue with the pump motor or trigger before any water damage is caused. There are no wires to worry about, and the installation process is amazingly simple.
Enjoy peace of mind and stop worrying about potential water damage.
back to top
|
|

by The WiSe Guys
|

Adding or Moving Wireless Gateways and
Sensors in the iMonnit Online Software.
With the recent enhancements to the iMonnit Online Wireless Sensor Monitoring Software, users now have the ability to create networks, add wireless gateways and sensors to those networks and move gateways and sensors between networks. To get started login to your wireless sensor account on www.imonnit.com, and follow these instructions.
1. Login to your iMonnit account. If you have purchased Monnit Wireless Sensors and do not yet have an account, you can "Create a New Account" from the main page of the site.
2. Once you are logged into your account, click on the "My Account/Settings" button in the menu bar. From the My Account area you can edit account settings, network settings and create networks by selecting them in the left menu.
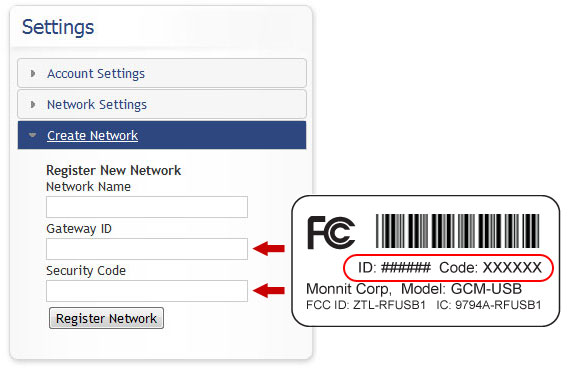
3. If you have not created a sensor network before and do not have any wireless sensors setup, you can create a new network by selecting "Create Network" in the left menu. Simply enter a name for your network and add a wireless gateway by entering the gateway ID and Security Code located on the bottom of the gateway.

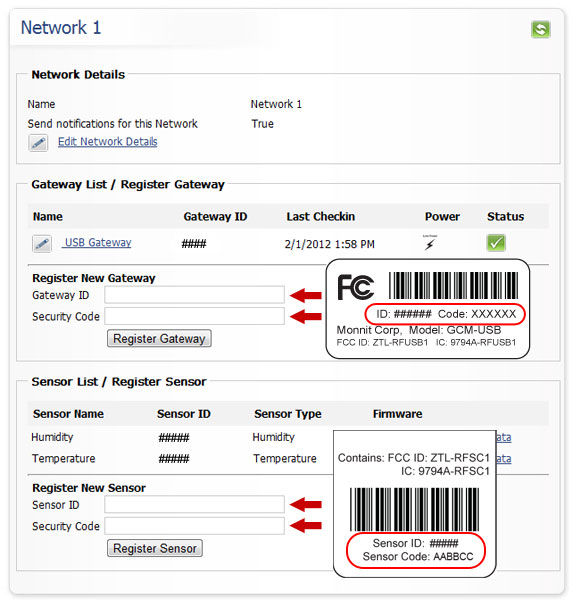
4. Once you have a wireless sensor network created, you can add gateways and sensors to it by clicking on the network name under "Network Settings" in the left menu.
5. To add a wireless gateway, enter the gateway ID and Security Code then click the "Assign Gateway" button. To add wireless sensors enter a sensor's ID and Security Code then click the "Assign Sensor" button.

6. If you have multiple gateways and wish to create additional networks, repeat step 3 to create as many networks as needed. Once the networks are created, repeat step 5 to add your remaining sensors or gateways.
If you wish to move a gateway or sensor from one network to another, select the network that you want to move the device to from the left menu's "Network Settings", then simply enter the ID and Security Code to assign the device on that network. Once assigned on the new network the device will be removed from the previous network.
« Read Other Tech Tips from the WiSe Guys
back to top
|
|
 |
|
All trademarks are property of their respective owners. © 2012 Monnit Corp. All Rights Reserved.
Monnit Corporation / ph 801-561-5555 / www.monnit.com

|
|
|


