Editing Wireless Sensor Configurations in
the iMonnit Online Software.
There have been some recent changes made to the sensor configuration sections of iMonnit. This tech tip will help you better understand the changes and show you how to use some of the new features.
To get started log into your iMonnit account at www.imonnit.com and click the edit button next to the sensor you wish to work with.

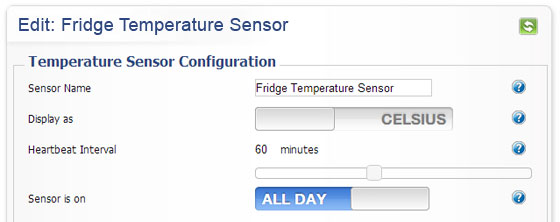
Depending on the type of sensor you are editing the available settings may differ slightly. We will use a temperature sensor for this article. The top portion of the edit screen gives you the basic settings for the sensor such as: Sensor Name and Heartbeat Interval (how frequently the sensor will send readings). To make a change to a setting, click and drag the slider or click on the number to type using your keyboard. For measurement type sensors such as temperature, you will see a display unit selector (example: Celsius and Fahrenheit). You will also see a selector to choose whether the sensor should be active all day or only during certain times of the day. This is useful to monitor conditions only during daytime hours or nighttime hours. Click and slide these selectors to change their settings.

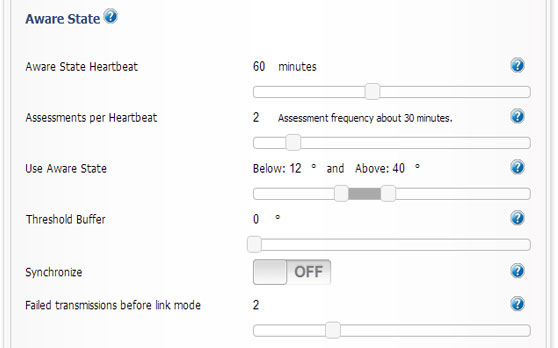
The bottom section of the sensor configuration screen will show you
the aware state settings. Sensor aware state allows a sensor to check against a setting in-between heartbeats to determine if it should trigger an RF communication immediately. This area varies based on basic or Premiere subscription levels. If you are using basic, you will be able to set an aware state threshold that the sensor will check against 6 times per heartbeat (example: if you have a 2 hour heartbeat, the sensor will check against this threshold every 20 minutes to determine if it should force a heartbeat.)

If you have an active Premiere subscription, you can truly customize the behavior of your wireless sensors. You can set an aware state heartbeat allowing you to get more frequent sensor readings when a threshold is exceeded. You can define how many times the sensor will check against the set thresholds between heartbeats. You get a high and low threshold for measurement type sensors. You can synchronize the sensors on your network so they all check in at the same time, and you have the ability to customize how many sensor heartbeats are missed before a sensor sleeps for two hours (default 2). To change any of these settings
simply click and drag the slider buttons or click on the numbers to type with your keyboard.

When you have finished making any changes to the sensor configuration page, click the "Save" button at the bottom of the screen to save the changes and return to the sensor details page.
For more information on iMonnit Premiere Monitoring Click Here!
For more information on using Monnit wireless sensors, visit the support section of our website.
back to top
|


