Install a Leaded Temperature Sensor on a Fridge, Freezer, or Reach-in Cooler
Sensor Overview
Three Monnit Temperature Sensors can help you monitor the contents of refrigerators, freezers, and walk-in and reach-in coolers. A Wireless Low Temperature Sensor can be attached to or installed near an ultralow temperature (ULT) freezer. Its lead goes inside the freezer to help you remotely monitor a range of temperatures at +/- 0.5°C calibrated accuracy from -200°C to 0°C/-328°F to 32°F.
Our Standard Temperature Sensors allow you to track temperatures between -40°F (-40°C) and 257°F (125°C) virtually anywhere and inside fridges and coolers.
With a push of a button, you can instantly read temperatures between -40°F (-40°C) and 257°F (125°C) inside a refrigerator with the ALTA Digital Temperature Sensor. This temp sensor offers a fast manual update or reading on an LCD to help you maintain constant data auditing, retrieval, and redundancy mandates for your operations.
Like all Monnit ALTA Sensors, you can receive instant alerts via text, email, or call if preset parameters change.
Installation Steps
If this is your first time setting up your Monnit system, you must first set up your iMonnit account and connect your ALTA IoT or Ethernet Gateway to iMonnit before registering your sensor. See this article for steps outlining how to get started: Creating an iMonnit account.
Step 1.
Remove the sensor from the package. If installing an industrial sensor, attach the antenna.
Step 2.
Register the sensor in iMonnit. Do not install the batteries until told to do so in iMonnit.
Step 3.
Determine the sensor’s installation location. We recommend placing the sensor in the location and making sure it reports to the gateway before final installation. See this article if you’re using an ALTA Site Survey Tool to perform a site survey to determine sensor installation location.
Step 4.
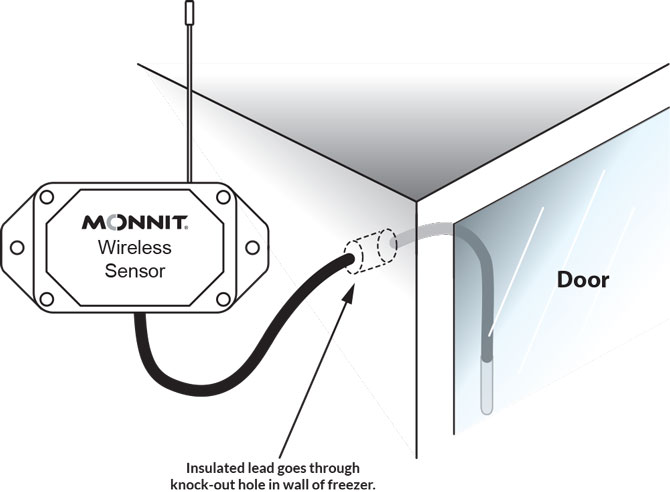
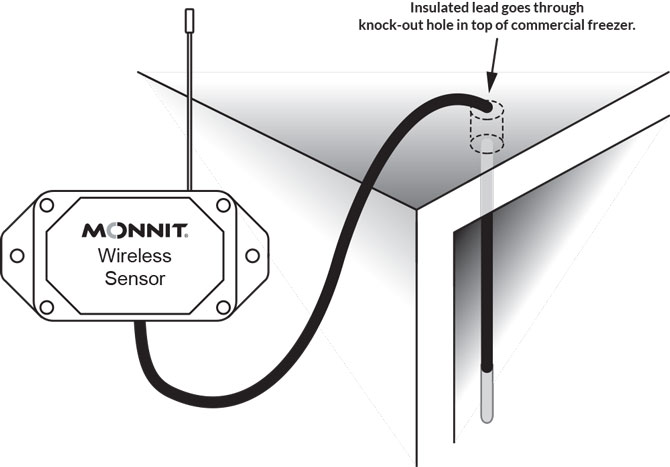
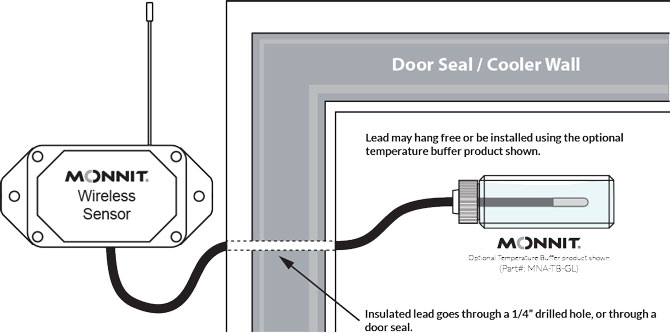
A) Some fridges and freezers come with predrilled knockouts that you can punch out to insert the lead. If this is your case, follow the manufacturer’s guidelines on how to do so. After inserting the lead, seal using the manufacturer’s recommendations. If none are available, Monnit recommends sealing the knockout with silicon. See Figures 1–2 to insert the lead and Figure 3 to buffer it.
B) If your fridge or freezer did not come with a predrilled knockout, you have two choices:
- Drill a hole yourself. See substep 4C.
- Run the lead through the door seal. See substep 4D.
Below we will go over those two steps.
C) If you decide to drill the hole yourself, you need to ensure that the area you choose to drill through DOES NOT contain coils or other vital operating parts. Please check your owner’s manual or other manufacturer’s resources before continuing to drill. Monnit is not responsible for damage that may occur by drilling the hole.
- After determining hole placement, drill a 0.25” (6mm) hole.
- Insert the temperature probe into the hole.
- Determine where you are going to leave the probe on the inside.
- Affix the probe to the inside.
- Seal the hole with a grommet or silicon.
D) If you decide to run the lead through the door seal, you must first determine that it will not pinch or crush the lead wire when the door is shut. This will damage your sensor.
- After determining the lead wire will be fine, puncture a 0.25” (6mm) hole in the door seal.
- Run the lead wire through the hole and affix the probe to the inside of the monitored device. See Figure 3 to buffer the lead.
- Check hole seal integrity and, if needed, use silicon to prevent leakage.
Step 5.
After ensuring that the sensor is communicating with the gateway, mount the sensor using the supplied screws or double-sided tape.