Open-Closed Sensor Installation Guide
Sensor Overview
Monnit ALTA Wireless, PoE•X, and MoWi WiFi Open-Closed Sensors use an external magnetic switch to detect the presence or removal of a trigger magnet. When the sensor detects that the magnet is removed or returned it sends the information to the iMonnit Online Sensor Monitoring and Notification System. The data is then stored in the online system and can be reviewed and exported as a data sheet or graph.
Installation Steps
If this is your first time setting up your Monnit system, you must first set up your iMonnit account and connect your ALTA Gateway to iMonnit before registering your sensor. See this article for steps outlining how to get started: Creating an iMonnit account.
Step 1.
Remove the sensor from the package. If installing an industrial sensor, attach the antenna.
Step 2.
Register the sensor in iMonnit. Do not install the batteries until told to do so in iMonnit.
Step 3.
Determine the sensor’s installation location. We recommend placing the sensor in the location and making sure it reports to the gateway before final installation. See this article if you’re using an ALTA Site Survey Tool to perform a site survey to determine sensor installation location.
Step 4.
After ensuring that the sensor is communicating with the gateway, mount the sensor using the supplied screws or double-sided tape. Install the lead wire with the magnet end in a location that will leave enough room for the lead wire to be no more than ¾” (19mm) away from the other magnet.
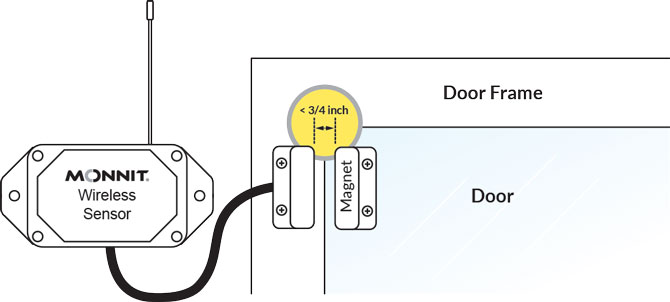
While the graphic above depicts installation on a door frame, follow the same process if mounting on a window, etc.
Step 5.
Mount the other magnet opposite the lead wire end, ensuring that both magnet ends are facing each other and not mounted more than ¾” (19mm) apart.