Account Overview
iMonnit is a cloud-based, mobile Internet platform for managing your products. Registering your account is essential because this is the first step in getting your sensors up and running. For your convenience, you can use any desktop browser or our App to register and maintain your account. The App is available in both Android and iOS devices.
Creating an account
Creating your iMonnit account is crucial unless you are using one of our on-premises software solutions or a third-party solution for your monitoring needs.
Summary of Steps
- Create New Account
- Enter required account information
- Create Network
- Add Devices
- Deploy and enjoy your iMonnit account.
Create a New Account
First open iMonnit by going to www.imonnit.com or selecting the iMonnit App on your smart phone. The landing page will appear. Select the Create Account option.
Enter the Required Account Information
The information in this section is required to create the account. This first screen prompts you to enter your Primary Contact information. The Primary Contact should be the person who will be doing most of the configurations and administering of the account. At the bottom of this form, there is a field for the Premier subscription code. Enter the code you received on the receipt emailed to you after your purchase of Premiere. If you have not yet purchased iMonnit and leave this field blank, the system defaults to a free 45-day trial of iMonnit Premiere.
Note: You will be required to acknowledge you have read and understand the Terms and Conditions before being able to proceed.
Create a Sensor Network
Your account will need one main sensor network, though you may choose to have more than one. The network name by default, is your first and last name as provided in the initial setup. This can be changed later if needed.

Add Gateways
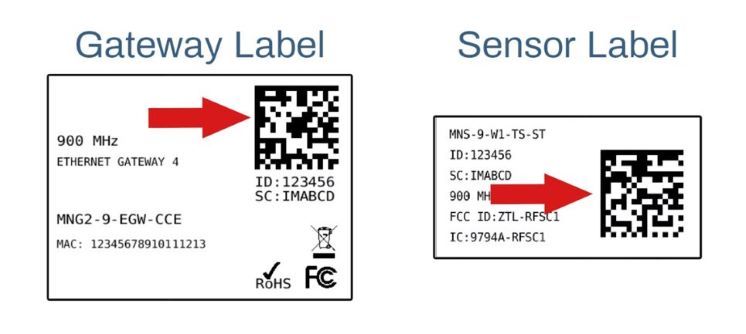
- Find the gateway ID on the back of the gateway
- Enter the Gateway ID in the field provided
- Enter the Gateway Security Code (This code is case sensitive; it will always be capital letters)
- Click “Add Device”
- Repeat the process with any additional gateways
Note: If you are using the mobile App, you may scan the QR codes on the gateways and Sensors with your smartphone if enabled with a QR scanner. This will add the devices directly to the account without manually typing in the IDs and Codes.

Add Sensors
- Enter the sensor ID
- Enter the Sensor Security Code (This code is case sensitive; it will always be capital letters)
- Click “Add Device”
- Repeat this process with all sensors
- Click “Finished Adding”
The iMonnit homepage will load with the number of sensors and gateways under the status boxes.
Conclusion
After following the steps above, the account is set up and ready to deploy. If you have trouble setting up your account, feel free to contact Monnit Support."
